
Strawberry Couronne Recipe

We had some friends visit and I wanted to bake something to serve with lunch that would be a sweet but not too sweet so I decided to make a couronne. I do adore these pastries and the add-ins are totally up to you. For today I made a strawberry couronne. The pastry is pretty benign so you could even go savory in my opinion.
I was looking for something on the sweet side and as we are in strawberry season here I thought they would be a perfect addition to this wonderful treat.
ALL PURCHASE LINKS ARE AFFILIATE LINKS WHICH MEANS IF YOU BUY ANYTHING THROUGH THEM I WILL RECEIVE A SMALL COMMISSION (AT NO ADDITIONAL COST TO YOU)

Strawberry Couronne
For the Dough
- 9 oz bread flour (around 2 cups)
- 1 tsp salt
- heaping tablespoon active dry yeast (1/3 oz)
- 3 1/2 TBS butter at room temperature
- 1/2 cup less 1 TBS milk
- 1 large egg, lightly beaten
For the Filling
- 1 stick unsalted butter, at room temperature
- 1/3 cup brown sugar
- pinch of salt
- 3 cups sliced strawberries
- 2 TBS sugar in the raw
For the Glaze
- 2 TBS lemon juice mixed with 1/4 cup powdered sugar (more/less juice if needed to make a glaze that will drizzle well)
Make the Dough:
Note: This post may contain affiliate links, which means if you buy from my link I might make a small commission. This does not affect the price you pay. See the full affiliate disclosure here.
Add the flour to the bowl of your stand mixer. Mix in the yeast, butter, egg, salt and milk. It will make a soft dough. (A note – a kitchen scale makes baking more precise)
Add the dough hook and knead for about 10 minutes or if you prefer knead by hand until you have a soft, silky dough.
Place the dough in a greased bowl and cover to let rise for an hour or until doubled in size
While the dough is rising,
Make the filling:
Beat the butter, salt and sugar in the raw together until smooth.
Cap the strawberries and cut into slices
Like a baking tray with parchment paper or silicone
When the dough is done it’s first rise, turn it out onto a lightly floured counter
Roll it out to a 13 x 10? rectangle
Add the sugar mixture and spread to just about the edges
Place the strawberries, in rows to cover the surface.
With the wide edge facing you, tightly roll the dough up like a jelly roll. (The video shows when I made a blackberry vanilla couronne but the methodology is the same)
Pinch the edge to close and roll it to seal.

Cut the dough all the way through, keeping it intact for just a little bit at the top

Twist the two pieces together, like a two part braid and then bring the ends together to form a circle (like a crown) pinch the two ends together gently to seal. Tuck in any pieces of strawberry that have fallen out.
Carefully place the dough on the prepared baking sheet, cover (I used a linen towel) and let rise until doubled in size. About 30 – 45 min
Preheat oven to 400°
Bake the couronne for 25 – 35 min until risen and golden brown. Turn halfway through baking

Cool on a wire rack
While the strawberry couronne is cooling heat the apricot jam with a splash of water. Using a pastry brush, brush the couronne with the jam to give it a nice shine.
Mix the confectioner’s sugar and lemon juice to make an icing. Drizzle it over the couronne
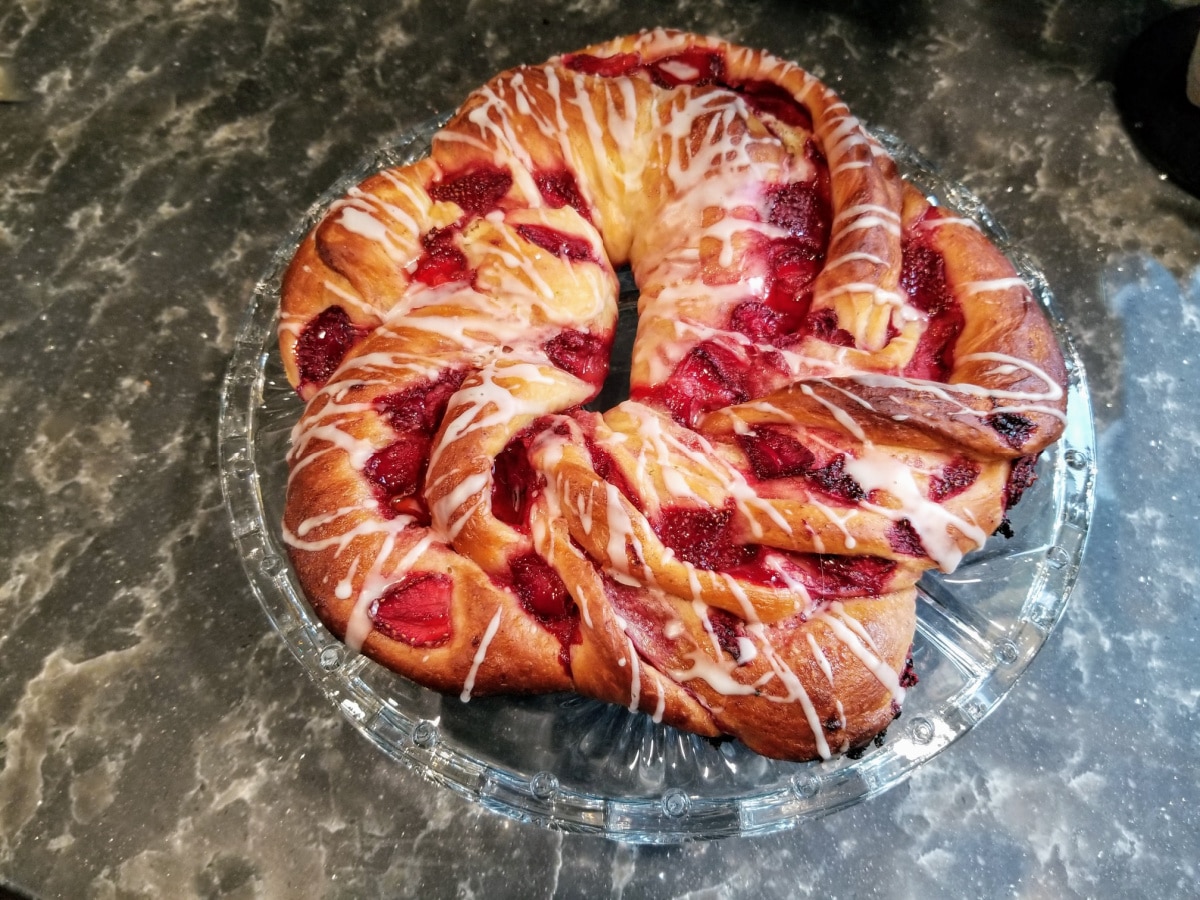
Let fully cool before serving
How Was the Strawberry Couronne?
It was yummy. It was a perfect dessert for a brunch with guests. The meal I served was simple – I will be sharing that later in the week. We all enjoyed this simple and delicious pastry.
I just love all of the variations available when it comes to making a couronne. You are only limited by your imagination. I have done apricot, strawberry pear, prune and dried cranberry, cherry and almond, and lest we not forget you can also do savory – goat cheese, bacon and sundried tomato couronne!
A couronne is a wonderful vehicle for breakfast, lunch, brunch or dessert and the filling possibilities are endless. I love a recipe like this where your imagination takes you where you can.


