How To Make A Rainbow Cake At Home
So are you looking for something fun maybe for a birthday party or just a summer get-together? A rainbow cake is perfect for any summer occasion with its bright colors and and how simple it is to make. Rainbow cakes are huge right now and I’m telling you that I have made this cake super simple to make. Anyone can do it!

When I look at this cake I just smile because sprinkles just do that to me! Or jimmies which ever you prefer. So let’s get down to baking this amazing colorful cake.

Whatcha gonna need:
Ingredients For The Rainbow Cake
- 2 Boxes chocolate fudge cake mix
- 6 large eggs
- 2 ½ C Whole Milk
- 1 C unsalted sweet cream, softened
- 3 9in round cake pans
- 3 10in round cake board
Vanilla Frosting ingredients
- 2 C unsalted sweet cream butter, softened
- 6 C powdered sugar
- 3 tbsp pure vanilla extract
- 6 tbsp heavy whipping cream
- Purple gel food coloring
- Sky Blue gel food coloring
- 2 10.5 oz Rainbow Jimmie Sprinkles (Found at walmart in the baking isle and cake decorating isle)
I will not lie I am way to busy in the summer to bake a cake from scratch let alone really want to so I used the chocolate fudge cake mix. You can totally use your “grandma’s super secret recipe” or just relax and go box!
So we all know how to make a boxed cake right? You just follow those directions on the? You guessed it….the box.
The fun starts when assembling the cake and decorating it.
Note: This post may contain affiliate links, which means if you buy from my link I might make a small commission. This does not affect the price you pay. See the full affiliate disclosure here.
Rainbow Cake Frosting Directions
So let’s get the fun started! Using a standing mixer, beat the butter, powdered sugar, vanilla and heavy whipping cream together until combined, smooth and stiff with peaks. Once the frosting is made, divide the 1 ½ C of frosting into 2 small bowls, leaving the rest in the mixing bowl for the outer layer of the cake. In one bowl, mix in 4 drops of purple gel food coloring. In the second bowl, mix in 4 drops of blue gel food coloring.
Building Colorful Cake
So here we go….we are ready to build your amazingly colorful rainbow cake. Remove the cakes from the pans and onto the cake boards.
Using a cake slicer, slice off the tops of the cakes to create a flat cake layer.

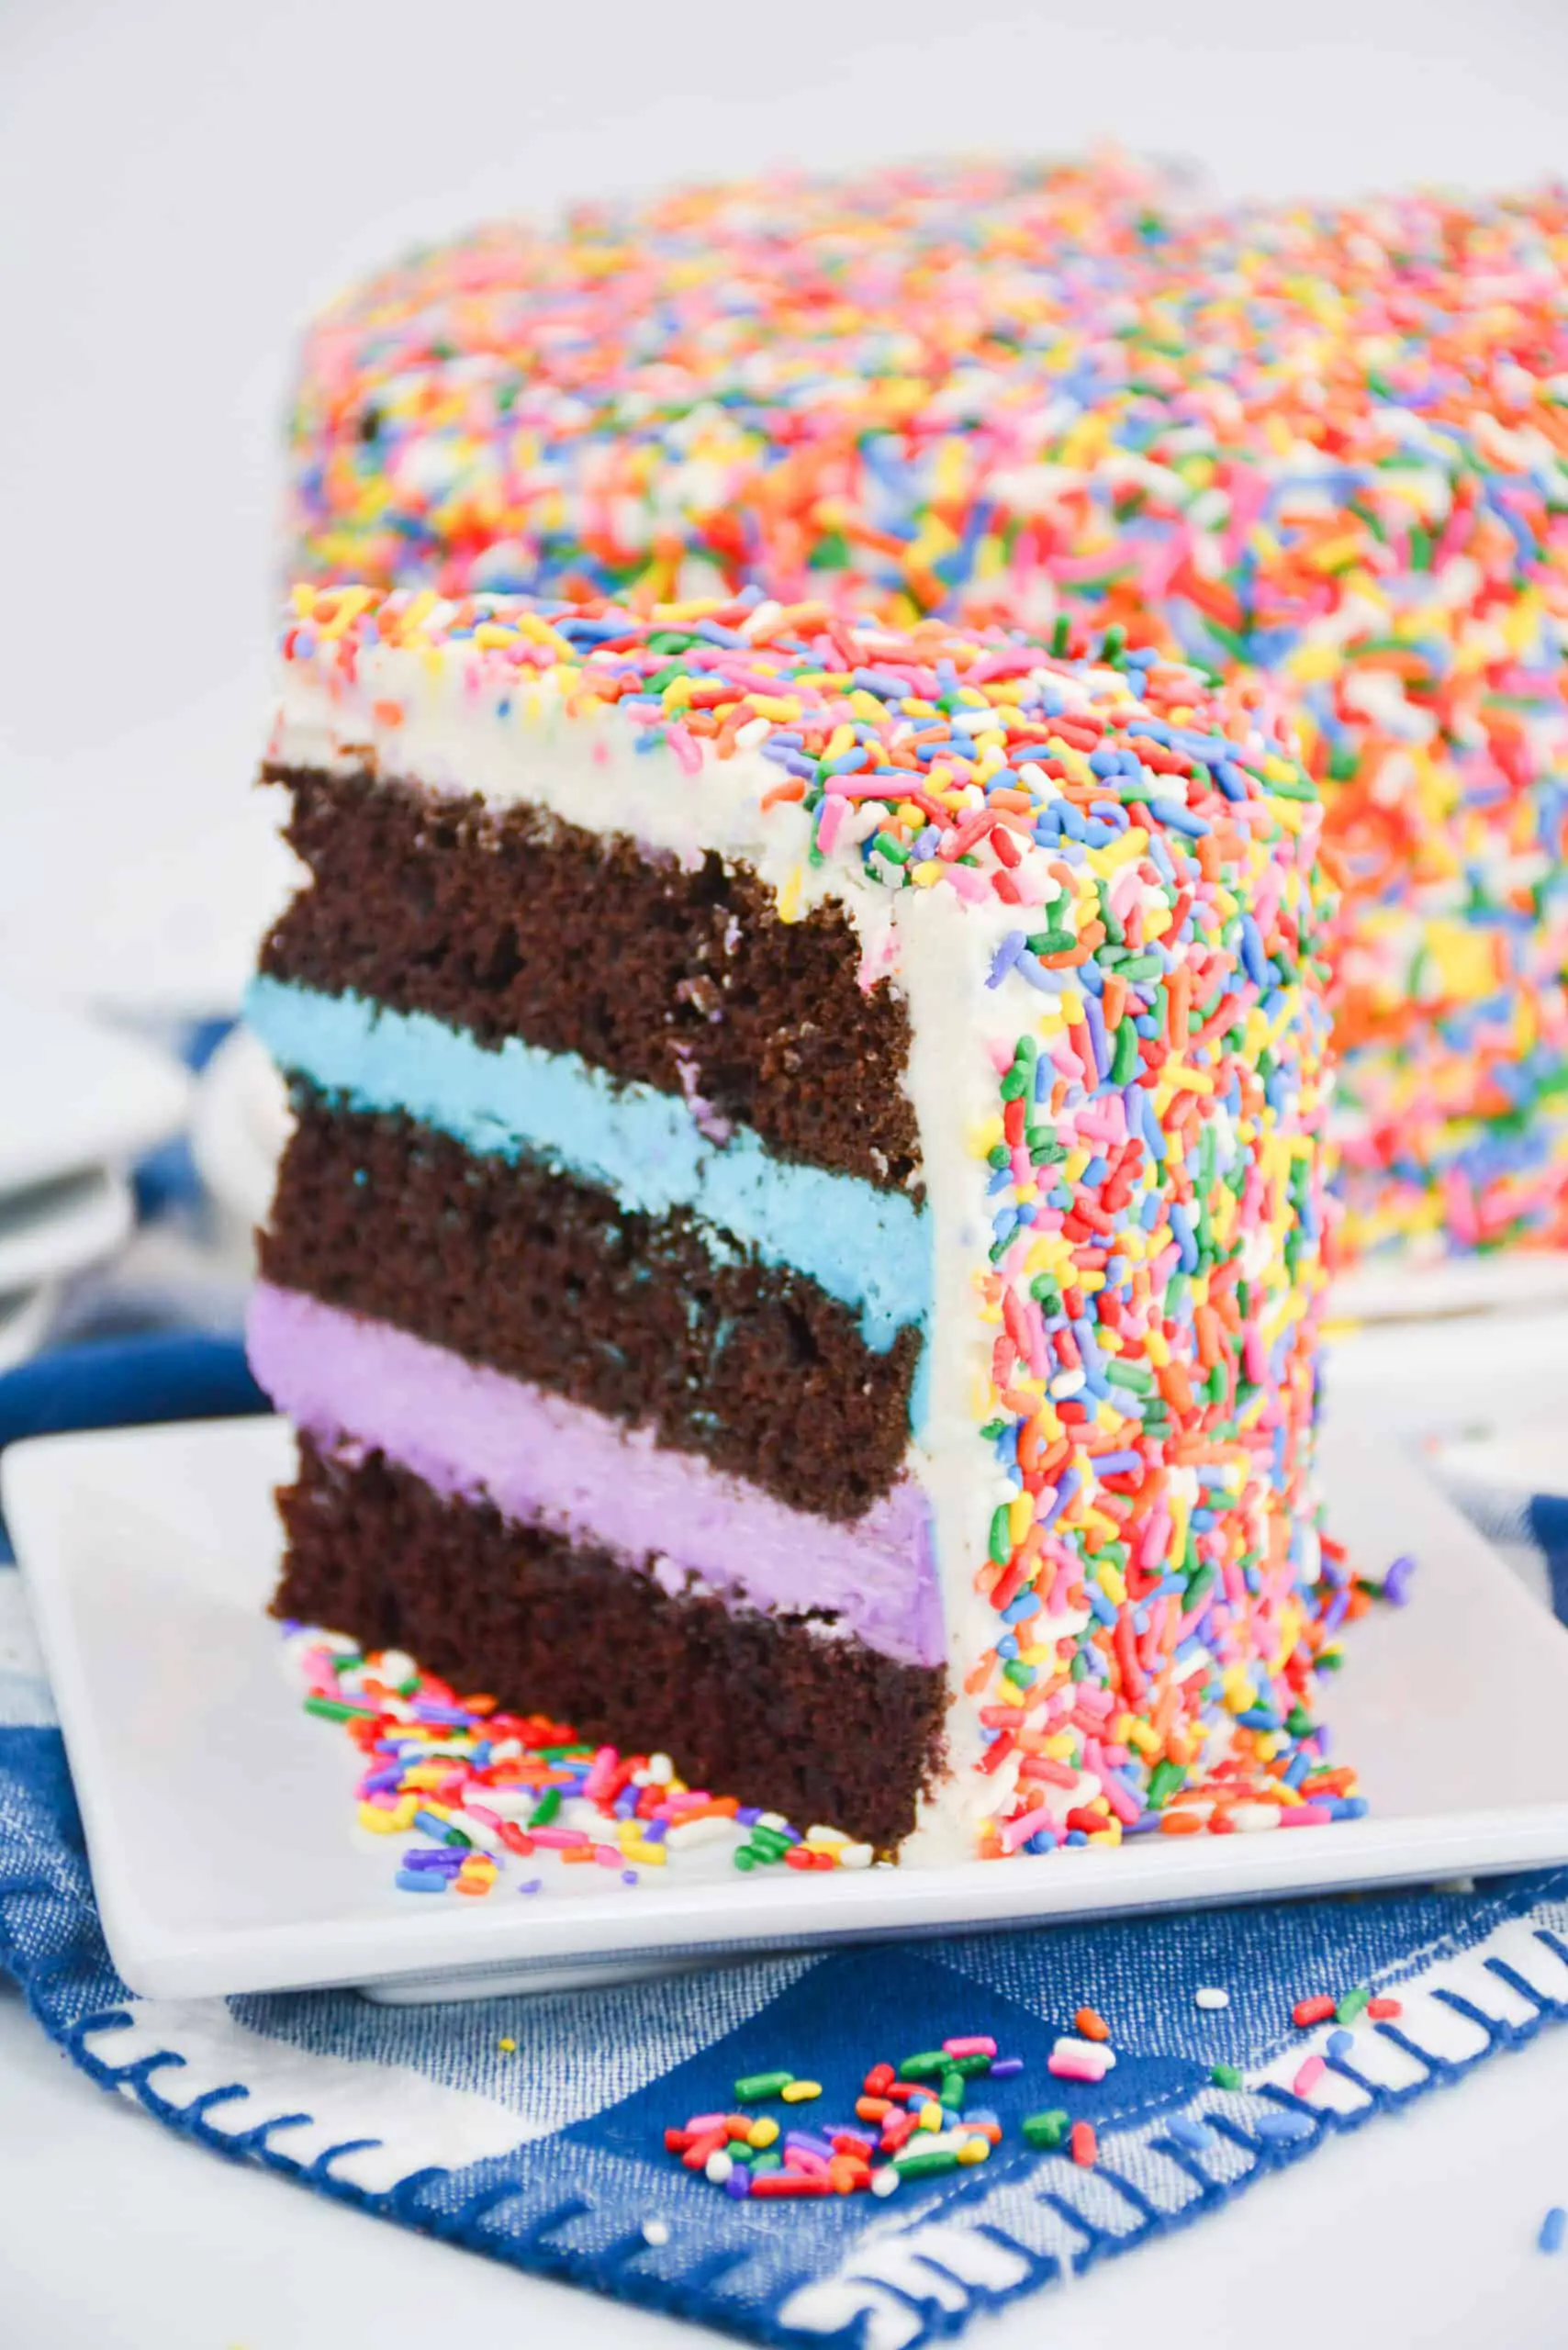
Using one of the cake layers as the bottom layer, scoop the purple frosting onto the cake layer and spread evenly

Place a second cake layer on top
Scoop the blue frosting on top of the cake layer and spread evenly

Place the third cake layer on top of the frosting.
Smooth the two frostings on the outside to create a smooth layer on the outside
Using the white frosting, completely coat the cake in the white frosting and smooth evenly

Place the cake onto a cookie sheet
Using the sprinkles, completely coat the cake in the sprinkles


Once coated, place the in the fridge for a few hours to allow it to harden. That is everything! This is so simple to do and really fun for guests or family.

One of my favorite parts about this recipe is the layers in between. You don’t have to use these colors, let your imagination take you where every you want to go.

Below you will find a full printable recipe and do make sure to save this. I know you will be making these for all occasions.
How To Make A Rainbow Cake At Home
Ingredients
- 2 Boxes chocolate fudge cake mix
- 6 large eggs
- 2 ½ C Whole Milk
- 1 C unsalted sweet cream, softened
- 3 9in round cake pans
- 3 10in round cake board
- Vanilla Frosting ingredients
- 2 C unsalted sweet cream butter, softened
- 6 C powdered sugar
- 3 tbsp pure vanilla extract
- 6 tbsp heavy whipping cream
- Purple gel food coloring
- Sky Blue gel food coloring
- 2 10.5 oz Rainbow Jimmie Sprinkles (Found at walmart in the baking isle and cake decorating isle)
Instructions
Preheat oven to 350 degrees and spray the cake pans with pam baking spray
Using a large bowl, beat the cake mix, butter, eggs, and milk until combined and smooth
Evenly divide the cake batter between the 3 pans
Place into the oven and bake for 22-26 minutes or until a toothpick comes out clean
Allow to cool completely before covering with foil and setting them aside to use the next day. By doing this, it will allow you to get a clean cut slice of cake
Frosting Directions
Using a standing mixer, beat the butter, powdered sugar, vanilla and heavy whipping cream together until combined, smooth and stiff with peaks
Once the frosting is made, divide the 1 ½ C of frosting into 2 small bowls, leaving the rest in the mixing bowl for the outer layer of the cake
In one bowl, mix in 4 drops of purple gel food coloring
In the second bowl, mix in 4 drops of blue gel food coloring
Building the cake directions
Remove the cakes from the pans and onto the cake boards
Using a cake slicer, slice off the tops of the cakes to create a flat cake layer
Using one of the cake layers as the bottom layer, scoop the purple frosting onto the cake layer and spread evenly
Place a second cake layer on top
Scoop the blue frosting on top of the cake layer and spread evenly
Place the third cake layer on top of the frosting
Smooth the two frostings on the outside to create a smooth layer on the outside
Using the white frosting, completely coat the cake in the white frosting and smooth evenly
Place the cake onto a cookie sheet
Using the sprinkles, completely coat the cake in the sprinkles
Once coated, place the in the fridge for a few hours to allow it to harden